Over 50,000 hot-selling automation module components.
Troubleshooting Schneider 140DDI Input Modules: A Field Guide

Troubleshooting Schneider 140DDI Input Modules: A Field Guide

The Role of External 24 VDC Field Power

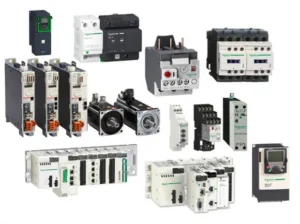
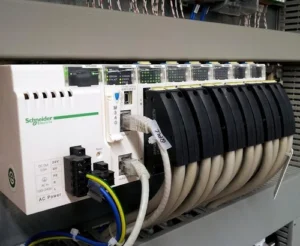
The Schneider Electric 140DDI digital input module serves as a cornerstone for the Quantum PLC series. It facilitates reliable data acquisition from field devices like limit switches and sensors. You will commonly find these modules in demanding environments such as oil refineries and pharmaceutical plants. However, engineers often face a specific challenge: all input LEDs remaining dark. This guide explores why this happens and how to restore system functionality quickly.

Unlike some basic controllers, the 140DDI does not provide internal power for field signals. Each channel requires an external 24 VDC source to function. If you notice all LEDs are off, the PLC logic is rarely the culprit. Instead, the issue usually stems from the field-side electrical circuit. A single tripped circuit breaker or a blown fuse can disable an entire module. Consequently, technicians must verify the voltage at the common (COM) terminal before replacing hardware.

Troubleshooting Schneider 140DDI Input Modules: A Field Guide

Distinguishing Backplane from Field Power Circuits

The Quantum architecture utilizes a sophisticated split-power design to protect sensitive electronics. The backplane powers the internal logic and communication, while the field supply handles the actual signal detection. Therefore, a module can appear “Healthy” or “Online” in EcoStruxure Control Expert even if the inputs are dead. This separation enhances safety but frequently misleads inexperienced maintenance staff during initial commissioning phases.

Managing Industrial Noise and Grounding Integrity

High-performance industrial automation requires clean electrical signals to prevent false triggering. While the 140DDI features robust noise immunity, poor wiring practices can compromise its performance. Floating commons or shared grounds with high-load motors often cause signal instability. In my experience at Powergear X Automation, ensuring a dedicated ground for DC signals significantly reduces intermittent data errors. Proper shielding and polarity management are essential for long-term system reliability.

Maintenance Best Practices for Harsh Environments

Facilities in the mining or heavy manufacturing sectors subject hardware to extreme vibrations. Over time, screw terminals can loosen, leading to intermittent signal loss. We recommend transitioning to spring-clamp terminal blocks where the environment allows. Additionally, implementing strain relief for heavy cable bundles prevents physical damage to the module connectors. Regular inspections during scheduled shutdowns ensure that the COM jumpers remain secure and conductive.

Expert Analysis by Powergear X Automation

The longevity of the Quantum series proves Schneider Electric’s commitment to industrial durability. However, as these systems age, the quality of the external power distribution becomes the weakest link. At Powergear X Automation, we believe that proactive power monitoring is better than reactive troubleshooting. Integrating a “Power OK” signal from your field supply into your PLC logic can save hours of diagnostic time. If you require high-quality components or technical support for your control systems, visit Powergear X Automation for expert solutions.

Technical Implementation Checklist

  • ✅ Measure voltage directly between the input terminal and the common point.
  • ✅ Verify that the module configuration in the software matches the physical hardware.
  • ✅ Inspect all external fuses and miniature circuit breakers (MCBs) feeding the rack.
  • ✅ Tighten all terminal connections to the manufacturer’s specified torque settings.
  • ✅ Confirm that the 24 VDC polarity aligns with the module’s wiring diagram.

Industrial Application Scenarios

Oil & Gas: Monitoring emergency shutdown (ESD) interlocks across remote wellhead sites.

Pharmaceuticals: Tracking valve positions in sterile batch processing environments to ensure safety.

Manufacturing: Integrating high-speed limit switches on assembly lines for precise motion control.

Frequently Asked Questions (FAQ)

Q1: How do I determine if the 140DDI module itself has failed?

If you confirm 24 VDC is present at the input terminals but the PLC registers no data, check the backplane status. If the “Active” LED is on but no inputs respond to a known live signal, the internal optocouplers may be damaged.

Q2: Can I mix different voltage types within the same Quantum I/O rack?

Yes, the Quantum backplane supports various modules. However, you must maintain physical separation between AC and DC field wiring. Mixing these in the same conduit can cause electromagnetic interference and lead to erratic signal behavior.

Q3: What should I prioritize when purchasing a replacement 140DDI module?

Verify the hardware revision and firmware compatibility with your existing CPU. It is also wise to check the condition of the terminal blocks. Buying from a reputable partner like Powergear X Automation ensures you receive tested, reliable components for your critical infrastructure.

How to Identify Unity Pro and Concept Quantum Modules

How to Identify Unity Pro and Concept Quantum Modules

Identify Compatibility Through CPU Part Numbers

Identifying the correct software environment for your Schneider Electric Modicon Quantum PLC is a vital skill for maintenance teams. For over 20 years, these systems have powered critical infrastructure in oil, gas, and power generation. However, using the wrong software can lead to communication failures or system crashes. At Powergear X Automation, we often see engineers struggle with this distinction during urgent repairs. This guide provides the technical clarity needed to ensure your factory automation remains stable.

The CPU serves as the brain of the Quantum rack and determines the software protocol. Unity Pro (now EcoStruxure Control Expert) uses modern IEC 61131-3 standards. In contrast, legacy Concept or ProWORX 32 systems utilize older register-based logic. You must check the physical nameplate on the CPU module first.

Unity Pro Series: Look for part numbers such as 140CPU651xx, 140CPU671xx, or 140CPU751xx.

Legacy Series: Older models like 140CPU113xx, 140CPU434xx, or 140CPU534xx typically run on Concept.

Expert Insight: Many “legacy” CPUs can actually be flashed with Unity firmware. However, this process is irreversible without specific Schneider tools. Always verify the current firmware version via the serial port before attempting a software connection.

How to Identify Unity Pro and Concept Quantum Modules

Analyze Communication Ports and Diagnostics

Communication capabilities offer another clue regarding the system’s generation. Unity-based Quantum controllers feature superior Ethernet integration and Modbus TCP diagnostics. These modules excel in modern DCS environments where data transparency is essential. Legacy systems often rely on Modbus Plus (MB+) or serial protocols. These older networks lack the cybersecurity features found in newer Control Expert environments. Therefore, migrating to Unity is often a prerequisite for enhancing industrial cybersecurity.

Evaluate Firmware and Hardware Designations

Schneider Electric updated the internal hardware of Quantum modules over time to support faster scan rates. Unity Pro modules generally offer larger memory capacities to handle complex function blocks. If your module includes a “U” in the hardware revision or a specific “Unity” sticker, it is pre-configured for modern software.

Maintain Performance with Consistent Rack Management

Mixing different generations within a single rack requires caution. While most Quantum I/O modules are “universal,” the CPU dictates the addressing format. At Powergear X Automation, we recommend these maintenance practices:

Label every rack with the specific software version used.

Document firmware revisions during every planned shutdown.

Store Unity-flashed spares separately from legacy spares.

Verify I/O compatibility using the Schneider Electric matrix.

Update cabinet drawings whenever you replace a CPU.

Strategic Planning for System Migrations

Upgrading from Concept to Unity Pro involves more than a simple file conversion. The logic structure changes from flat registers to structured data. Moreover, you must re-verify all I/O mapping. We suggest performing a Factory Acceptance Test (FAT) to mitigate risks. This ensures that the new control system behaves exactly like the legacy hardware.

Frequently Asked Questions

Q: Can I use my old ProWORX ladder logic directly in Unity Pro?

No, direct imports are rarely seamless. Unity Pro uses a different database structure. You should use a conversion tool, then manually audit the logic for safety.

Q: Which hardware should I buy if I want to future-proof my plant?

Always prioritize 140CPU65160 or higher. These models support the latest EcoStruxure Control Expert features and have better availability in the secondary market.

Q: How do I recover a system if the CPU firmware is unknown?

Connect via the Modbus port using a terminal emulator or the “Loader” utility. This will reveal the OS version without risking a software mismatch crash.

Application Scenario: Refinery Migration

A mid-sized refinery recently faced frequent downtime due to aging Modbus Plus networks. By replacing their 140CPU434 (Concept) with a 140CPU651 (Unity), they transitioned to high-speed Ethernet. This move reduced troubleshooting time by 40% and allowed for real-time data flow to their SCADA system.

For more technical guides or to source reliable Schneider Electric components, visit Powergear X Automation for expert support and high-quality hardware.

Maximizing I-O Capacity in Schneider Electric Quantum PLC Systems

Maximizing I/O Capacity in Schneider Electric Quantum PLC Systems

Architectural Distribution of High-Density I/O

The Schneider Electric Quantum PLC stands as a powerhouse in the industrial automation sector. While specifications highlight a maximum of approximately 64,000 I/O points, the true value lies in how engineers manage this massive scale. This capacity supports complex operations in oil and gas, power generation, and chemical processing. However, reaching these theoretical limits requires a deep understanding of network architecture and processing constraints.

A single rack cannot house 64,000 points. Instead, the Quantum series achieves this scale through a distributed I/O framework. Engineers utilize Remote I/O (RIO) via coaxial or fiber optics alongside Ethernet-based distributed I/O (NOE modules). This strategy shortens cable runs and reduces signal interference in expansive facilities like refineries. From my experience at Powergear X Automation, minimizing physical wiring significantly lowers long-term maintenance costs and improves signal integrity.

Maximizing I-O Capacity in Schneider Electric Quantum PLC Systems

Balancing CPU Scan Time and Control Performance

High I/O counts inevitably increase memory consumption and extend CPU scan cycles. While the hardware can address tens of thousands of points, performance often degrades before reaching the limit. Critical systems, such as Emergency Shutdown (ESD) or high-speed interlocks, require deterministic behavior. Therefore, you should isolate fast-acting loops from bulk monitoring signals. This approach aligns with IEC 61131-3 standards, ensuring that large-scale factory automation remains responsive and safe.

Optimizing Network Bandwidth for System Reliability

System reliability depends heavily on network segmentation. As you add more I/O “drops,” the traffic on RIO or Modbus TCP networks increases. Without proper management, communication delays can cause intermittent system timeouts. We recommend using RIO for mission-critical, deterministic tasks and Ethernet for general supervisory data. This dual-layer strategy prevents bottlenecks and ensures that the control systems maintain high availability even during peak data loads.

Field Maintenance Strategies for Robust Operation

In high-vibration environments like turbine halls, physical stability is paramount. Loose terminals represent a leading cause of intermittent faults in large-scale PLC installations. Use reinforced DIN rails and terminal retention clips to secure connections. Additionally, since Quantum modules lack native surge protection, always install external arresters for outdoor signals. Following IEC 61000-4-5 guidelines for surge immunity will protect your hardware investment from lightning and switching transients.

Expert Commentary: The Powergear X Automation Perspective

At Powergear X Automation, we believe the “64,000 points” figure is more than a headline—it is a design philosophy. It provides the “headroom” necessary for brownfield expansions without requiring a total system rip-and-replace. However, bigger is not always better. The most resilient systems we design often prioritize fault isolation over sheer density. If your project nears 20,000 points, consider splitting the logic across multiple CPUs to enhance redundancy and simplify troubleshooting.

Engineering Technical Checklist

  • ✅ Mounting: Use heavy-duty DIN rails for vibration resistance.
  • ✅ Wiring: Implement single-point grounding for all I/O shields.
  • ✅ Logic: Separate safety-critical code from general monitoring tasks.
  • ✅ Network: Validate bandwidth utilization before adding new RIO drops.
  • ✅ Documentation: Sync PLC addresses with SCADA tag databases daily.

Application Case: Chemical Plant Expansion

A mid-sized chemical processor recently expanded its production line by 30%. By leveraging the existing Quantum PLC’s high I/O ceiling, the engineering team added three remote Ethernet I/O drops without upgrading the central CPU. This saved the client approximately $45,000 in hardware and programming labor. This “pay-as-you-grow” capability is why the Quantum series remains a staple in heavy industry.

For high-quality Schneider Electric components and expert technical support, visit the Powergear X Automation website to browse our latest inventory.

Frequently Asked Questions (FAQ)

1. When should I stop adding I/O to a single Quantum CPU?

While the limit is high, you should evaluate CPU scan time once you exceed 10,000 points. If your scan time exceeds 50ms for critical processes, consider distributing the load to a second PLC for better responsiveness.

2. Can I mix old Modicon RIO with newer Ethernet I/O?

Yes, but it requires careful timing configuration. Different network protocols have varying update cycles. Always verify that your high-speed interlocks are not delayed by the slower polling rates of legacy hardware.

3. What is the most common failure point in high-density Quantum systems?

Physical connection failure is the primary culprit. In large systems, thermal expansion and vibration can loosen terminal blocks. We recommend annual torque checks and using vibration-rated mounting hardware for all high-density racks.

Schneider Quantum PLC Watchdog Fault: Adjustment Best Practices

Schneider Quantum PLC Watchdog Fault: Adjustment Best Practices

Understanding the Logic Behind PLC Scan and Watchdog Limits

Managing a Schneider Electric Quantum PLC requires a deep understanding of its protective mechanisms. The software watchdog acts as a critical fail-safe, halting the CPU if the scan cycle exceeds a defined limit. In sectors like oil and gas or chemical processing, an unoptimized watchdog can cause catastrophic downtime. Therefore, engineers must balance system responsiveness with operational stability to maintain high industrial automation standards.

The watchdog timer monitors the time the CPU takes to complete one full logic cycle. If complex calculations or heavy communication tasks delay the cycle, the PLC triggers a “Watchdog Fault” and enters STOP mode. Consequently, this prevents the controller from executing stale logic or losing control of the process.

Most control systems experience increased scan times due to:

Large-scale PID loop execution.

Extensive Ethernet I/O scanning via Modbus/TCP.

Legacy code structures that lack optimization.

Schneider Quantum PLC Watchdog Fault: Adjustment Best Practices

How to Configure Watchdog Settings in Control Expert

To adjust the watchdog time, you must use EcoStruxure Control Expert (formerly Unity Pro). Navigate to the PLC Configuration and locate the “General” tab under “Properties.” Here, you can define the Watchdog Time in milliseconds.

Practical Configuration Steps:

Monitor the maximum scan time during full production load.

Set the watchdog value to 1.5 or 2 times the maximum scan duration.

Verify the changes in a simulation environment before deploying to live hardware.

The Impact of Communication Loads on CPU Performance

In my experience at Powergear X Automation, we often find that “ghost” watchdog faults stem from network saturation. High-frequency SCADA polling or unmanaged Modbus requests consume CPU resources. Instead of simply increasing the watchdog timer, engineers should prioritize optimizing the communication task load. Moreover, balancing the “Communication vs. Logic” ratio in the CPU settings often resolves stability issues without compromising safety.

Strategic Solutions for Reducing Scan Time Peaks

Relying on a longer watchdog timer is often a temporary “band-aid” for underlying logic inefficiencies. To achieve true factory automation excellence, you should restructure the program.

Move non-critical logic to periodic or event-driven tasks.

Use specialized function blocks to handle complex math more efficiently.

Segment large networks into smaller, manageable sub-routines.

Engineering Best Practices for System Maintenance

✅ Technical Optimization Checklist:

Always record baseline scan times before making software changes.

Evaluate CPU utilization after adding any new remote I/O modules.

Ensure the latest firmware version is installed to improve processing efficiency.

Audit the network topology to reduce Ethernet collisions and delays.

Review IEC 61131-3 compliance for all custom-written logic blocks.

Author’s Perspective: The Powergear X Automation Insight

At Powergear X Automation, we believe the watchdog fault is a diagnostic tool, not just an error. While many technicians immediately increase the timer to stop the tripping, we recommend a deeper dive into the CPU’s diagnostic buffer. Increasing the time might mask a failing communication module or a memory leak. In the world of DCS and high-end PLCs, stability is achieved through efficiency, not by widening the margins for error.

Application Scenario: Chemical Batch Processing

In a chemical plant, a Quantum PLC was experiencing intermittent watchdog trips during the start of a new batch. Our investigation revealed that the simultaneous activation of 50 PID loops caused a massive scan time spike. By transitioning these loops into a periodic task staggered over 100ms intervals, we stabilized the scan time. As a result, the plant avoided unnecessary stops while keeping the watchdog at a conservative, safe limit.

Frequently Asked Questions (FAQ)

Q: How do I choose between upgrading the CPU or tuning the software?

A: If your average scan time consistently exceeds 70% of your watchdog limit even after optimization, the hardware is likely at its physical limit. Upgrading to a higher-spec Quantum or M580 processor is often more cost-effective than risking a process failure.

Q: Can external network security scans cause watchdog faults?

A: Yes. Intensive IT vulnerability scans can overwhelm the Quantum’s Ethernet port. We recommend implementing industrial firewalls to filter non-essential traffic from reaching the PLC backplane.

Q: Is there a specific standard for setting watchdog margins?

A: While there is no “one-size-fits-all” number, industry veterans follow the 50% margin rule. If your peak scan is 50ms, set your watchdog to 75ms-100ms to allow for minor fluctuations without sacrificing rapid fault detection.

For professional hardware support and advanced system integration strategies, visit Powergear X Automation to explore our full range of industrial solutions.

Schneider Electric Quantum

Schneider Electric Quantum I/O and Motion Modules Guide

Welcome to the cutting-edge world of industrial automation

Today, we explore key components of the robust Schneider Electric Quantum PLC platform. This powerful system drives efficiency in countless factory automation settings. We will examine specific I/O and motion modules. Understanding these modules is crucial for reliable control systems design.

Schneider Electric Quantum

Understanding Digital Input Modules: 140DAI34000 and 140DAI35300

Digital input (DI) modules are the eyes of your PLC system. They monitor ON/OFF status from field devices. The Schneider Electric Quantum line features two notable DI modules.

140DAI34000: The Versatile AC Input Solution

The 140DAI34000 is a 24V AC input module. It handles signals from AC-powered sensors or switches. This module offers 16 discrete input points. Its isolation protects the internal electronics effectively. Therefore, it is ideal for noisy industrial environments. Moreover, its design ensures high signal integrity.

✅ Function: Digital AC Input
⚙️ Voltage: 24V AC Nominal
🔧 Points: 16 Discrete Inputs

140DAI35300: High-Density DC Input Power

The 140DAI35300 increases input density significantly. This module provides 32 points of 24V DC input. Using DC power is standard for many modern sensors. As a result, this module saves valuable rack space. Engineers often choose it for large-scale applications. Its high density reduces system footprint and cost.

✅ Function: Digital DC Input
⚙️ Voltage: 24V DC Nominal
🔧 Points: 32 Discrete Inputs

Schneider Electric Quantum

Digital Output Modules: Driving Industrial Actuators with Precision

Digital output (DO) modules are the hands of the DCS or PLC. They send ON/OFF commands to actuators. These actuators include relays, solenoids, and motor starters.

140DDO15310: High-Speed TTL Output for Critical Control

The 140DDO15310 features TTL (Transistor-Transistor Logic) output. TTL signaling is very fast and low voltage (5V DC). This makes it perfect for connecting to other logic circuits. Consequently, engineers use it in high-speed communication applications. It is less common for direct solenoid control.

✅ Function: Digital TTL Output
⚙️ Signal Type: TTL (5V DC)
🔧 Application: High-speed signaling, inter-logic device communication

140DDO88500: Robust High-Power DC Switching

The 140DDO88500 provides powerful DC output switching. This module typically handles 24V DC field loads directly. It offers 12 isolated output points. High current capacity is a key feature here. Therefore, it can drive larger industrial devices. This module is a workhorse in general industrial automation.

✅ Function: Digital DC Output (High Power)
⚙️ Voltage: 24V DC Nominal
🔧 Points: 12 Discrete Outputs

Understanding the Principles and Application Scenarios

The fundamental principle for all these I/O modules is electrical isolation. Isolation protects the sensitive PLC backplane from field noise. High-speed counting or simple state monitoring dictates the module choice.

Application Scenarios:
Process Plants (Oil & Gas): DI/DO modules monitor valve positions and pump status.
Manufacturing Lines: They control conveyor belts and robotic grippers.
Building Automation: They manage lighting and HVAC equipment.

Schneider Electric Quantum

The Specialized Motion Control: 140MSB10100

Motion control is a specialized subset of industrial automation. It demands very precise timing and command execution.

140MSB10100: Dedicated Servo and Stepper Control

The 140MSB10100 is a dedicated motion control module. It manages complex motion profiles for motors. This includes position, velocity, and torque control. In addition, it offloads demanding calculations from the main CPU. This improves overall system performance. A recent MarketsandMarkets report suggests motion control is a key growth area in factory automation.

✅ Function: Multi-Axis Motion Control
⚙️ Control Type: Servo and Stepper Motor
🔧 Benefit: Enhanced precision and reduced CPU load

Selecting the Right Quantum Module: Key Distinctions

Module selection depends entirely on field requirements. Distinctions exist in signal type, density, and speed.

Feature140DAI34000 (AC)140DAI35300 (DC)140DDO15310 (TTL)140DDO88500 (DC)
Signal TypeAC (24V)DC (24V)DC (5V Logic)DC (24V Power)
Point DensityLow (16)High (32)High (20+ typically)Low (12)
Speed/PowerStandardStandardHigh Speed/Low PowerStandard/High Power

The 140MSB10100 stands apart. It handles complex algorithms, unlike the simple I/O modules. Choosing between the 140DAI series means assessing field voltage. Output choice balances speed (TTL) versus power (High Current DC).

Author’s Insight: Powergear X Automation’s Perspective

As an experienced engineer, I see a clear trend. The push for smarter factories requires this module diversity. High-density I/O like the 140DAI35300 minimizes cabinet size. Dedicated motion control (140MSB10100) is non-negotiable for high-throughput machines. However, simple I/O remains the backbone. Therefore, correctly scoping your I/O is critical. Many projects fail due to inadequate field device power budgeting. Always over-spec your output current capacity slightly.

To explore more advanced automation solutions, please visit Powergear X Automation https://www.powergearx.com/. We offer expert consultation on designing robust control systems.

Application Case Study: Automated Packaging Line

A client needed a high-speed, flexible packaging solution.
Solution: We chose the 140DAI35300 for 24V DC sensor inputs (32 points). The 140DDO88500 controlled the pneumatic solenoids. Crucially, the 140MSB10100 managed the product indexing servo motor. This combination ensured both fast throughput and precise material handling. The system achieved a 15% increase in production rate.

Frequently Asked Questions (FAQ)

Q1: How do I decide between AC and DC input modules for a legacy system?
A1: Check the voltage of your existing field devices (e.g., limit switches). If they run on 120V AC, you must use an AC input module like the 140DAI34000. If you are installing new 24V sensors, always opt for DC inputs. DC is generally safer and less prone to electrical noise.

Q2: What is the main experiential challenge when commissioning the 140MSB10100?
A2: The biggest challenge is parameter tuning. A simple I/O module is plug-and-play. The 140MSB10100 requires precise configuration of motor parameters. You must accurately tune the Proportional-Integral-Derivative (PID) loop. This ensures smooth acceleration and deceleration, preventing mechanical stress and instability.

Q3: Can I mix Quantum I/O modules from different voltage ranges in the same rack?
A3: Yes, you can. The Quantum backplane manages the communication regardless of module voltage. However, never mix the field wiring voltages. For example, ensure 24V DC is only connected to your DC modules. Mixing field voltages can permanently damage the modules.

Back to Top
Product has been added to your cart